Peasy Docs
overview
Welcome to the Peasy documentation! Peasy is a privacy-first analytics platform that unifies web and AI visibility in a single view. With server‑side insights, Peasy captures user engagement and AI chatbot activity - built for accuracy, privacy and growth in the post-cookie era.
we are working hard to make Peasy the best analytics tool for you. we are always open to feedback and suggestions. if you have any questions or need help, please feel free to email us or reach out on X/Twitter @Peasyso.
Getting started is simple: sign up, follow the guided setup, add your website, paste one line of code - and you’re ready. Page views and events will appear instantly in your dashboard.
💡 This guide includes advanced options for customization, but the basic setup takes less than a minute.
here are a few places to get you up and running quickly:
installation
to start using peasy, you should include the following script in the <head> of your HTML. replace <website_id> with your actual website id, which can be found in the peasy dashboard under settings:
<script src="https://cdn.peasy.so/peasy.js" data-website-id="<website_id>"></script>you can also use the minified version of the script by changing peasy.js to peasy.min.js.
then go to your website and click around a few pages. these views will count as your first events and you’ll see them right on the dashboard. that’s it.
all page views are tracked automatically by default.
configuration
the script can be configured using the following data attributes:
data-website-id
your website id from the peasy dashboard. this is required.
<script data-website-id="<website_id>" src="https://cdn.peasy.so/peasy.js"></script>data-ingest-url
a custom ingest url to use when proxying events. this is optional. see proxying through cloudflare workers for more information.
<script
  data-ingest-url="<ingest_url>"
  data-website-id="<website_id>"
  src="https://cdn.peasy.so/peasy.js"
  async
></script>
data-mask-patterns
a comma separated list of patterns to mask in URL tracking. this works by masking the parts of a URL that match the pattern. ideal for when you want to hide sensitive information contained in the url like /customer/*/order/*. this is optional.
<script
  data-mask-patterns="/customer/*/order/*,/customer/*"
  data-website-id="<website_id>"
  src="https://cdn.peasy.so/peasy.js"
  async
></script>
data-skip-patterns
an array of pages or patterns you don’t want to be tracked. these can be exact page paths like /blog/article-1 or wildcard patterns like /admin/*.
<script
  data-skip-patterns="/blog,/admin/*"
  data-website-id="<website_id>"
  src="https://cdn.peasy.so/peasy.js"
  async
></script>
data-auto-page-view
enable/disable automatic page view tracking. defaults to true.
<script
  data-auto-page-view="false"
  data-website-id="<website_id>"
  src="https://cdn.peasy.so/peasy.js"
  async
></script>
basics
peasy has three methods that you can use to track events and manage visitor profiles:
track, page, and setProfile. additionally, you can set attributes like data-peasy-event
to track clicks and other browser events.
track custom events
The track method allows you to track custom events within your application. This is useful for monitoring specific actions that users take, such as completing a purchase or signing up for a newsletter.
peasy.track('order_created', {
  order_id: 123,
  total: 100
});
manually track page views
The page method is for manually tracking page views when the data-auto-page-view option is set to false.
peasy.page();set visitor profile
The setProfile method allows you to set or update the profile of a visitor. great for tracking your authorized users.
peasy.setProfile('123', {
  name: 'John Doe',
  avatar: 'https://yoursite.com/images/avatar.png'
});
form submission tracking
peasy can automatically track form submissions with detailed field data:
<form data-peasy-event="signup_form_submit" data-peasy-event-form_type="">
  <input type="email" name="email" />
  <input type="text" name="name" />
  <input type="password" name="password" />
  <input type="checkbox" name="receive_newsletter" />
  <input type="text" name="sensitive" data-peasy-ignore />
  <button type="submit">Submit</button>
</form>
The form submission event will include:
- all non-empty field values (except passwords and fields with the
data-peasy-ignoreattribute) - the form’s action url
- any additional data-peasy-event-* attributes
- checkbox and radio button states
click tracking
track element clicks with custom metadata:
<!-- Simple button tracking -->
<button data-peasy-event="login_click">Log In</button>

<!-- With dynamic attributes -->
<button
  data-peasy-event="purchase_click"
  data-peasy-event-product_id="123"
  data-peasy-event-price="99.99"
  data-peasy-event-currency="USD"
>
  Buy Now
</button>
our terms and what they mean
throughout the dashboard and documentation, you may see a few terms that may be unfamiliar. here is a quick overview of what they mean:
event
an event is a user interaction with your website. this could be a page view, a button click, a form submission, or any other action that you want to track.
an event may have additional data associated with it, such as the form fields of a form submission or the metadata of a button click you want to track (e.g., the amount of a purchase or the product id).
view/page view
a page view is a single instance of a user viewing a page on your website. this is tracked automatically by default.
visitor
a visitor is a unique user that interacts with your website. each visitor is assigned a unique hash that is used to track their interactions. a new hash is calculated by combining the visitor’s ip address, user agent, and a random daily salt from our servers. this means that if someone visits your website on a new device, they will count as a new visitor unless they have a profile id associated with them.
visit
a visit is a collection of page views and events that occur during a single session on your website. a visit ends when a visitor leaves your website or after a period of inactivity (10 minutes by default).
bounce rate
the bounce rate is the percentage of visitors who navigate away from your website after viewing only one page. a high bounce rate can indicate that your website is not engaging or that visitors are not finding what they are looking for.
avarage visit duration
the avarage visit duration is the avarage amount of time your visitors spend on your website during a single visit.
INTEGRATIONS
Next.js
adding peasy to your Next.js project is straightforward. Simply import next/script and include the peasy.js script in your project. follow the steps below to get started.
basic setup
in your main layout file, add the following code:
import Script from 'next/script'

...

export default function RootLayout({ children }) {
  return (
    <html lang="en">
      <body>
        <Script
          src="https://cdn.peasy.so/peasy.js"
          data-website-id="<website_id>"
          strategy="afterInteractive"
        />
        {children}
      </body>
    </html>
  );
}
that’s it! once the script is added, peasy will automatically start tracking user interactions. navigate through your app, and events will appear in your dashboard.
TypeScript support
to enable TypeScript support for peasy’s script methods, add the following type declarations to your globals.d.ts file:
// globals.d.ts
declare global {
  interface Window {
    peasy?: {
      init: () => void;
      track: (event: string, data: Record<string, any>) => void;
      page: () => void;
      setProfile: (id: string, data: Record<string, unknown>) => void;
      disableTracking: () => void;
    };
  }
}

export {};
with this in place, you can now use the peasy object in your project with full TypeScript type hints.
Sveltekit
adding peasy to your Sveltekit project is straightforward. Simply add the snippet below to your main +layout.svelte file to include the peasy.js script in your project.
basic betup
in your main layout file, add the following code:
<svelte:head>
  <script src="https://cdn.peasy.so/peasy.js" data-website-id="<website_id>" async></script>
</svelte:head>
that’s it! once the script is added, peasy will automatically start tracking user interactions. navigate through your app, and events will appear in your dashboard.
TypeScript support
to enable TypeScript support for peasy’s script methods, add the following type declarations to your app.d.ts file:
// app.d.ts

declare global {
  interface Window {
    peasy?: {
      init: () => void;
      track: (event: string, data: Record<string, any>) => void;
      page: () => void;
      setProfile: (id: string, data: Record<string, unknown>) => void;
      disableTracking: () => void;
    };
  }
}

export {};
with this in place, you can now use the peasy object in your project with full TypeScript type hints.
Google Tag Manager
To add Peasy to your Google Tag Manager project, follow the steps below.
-
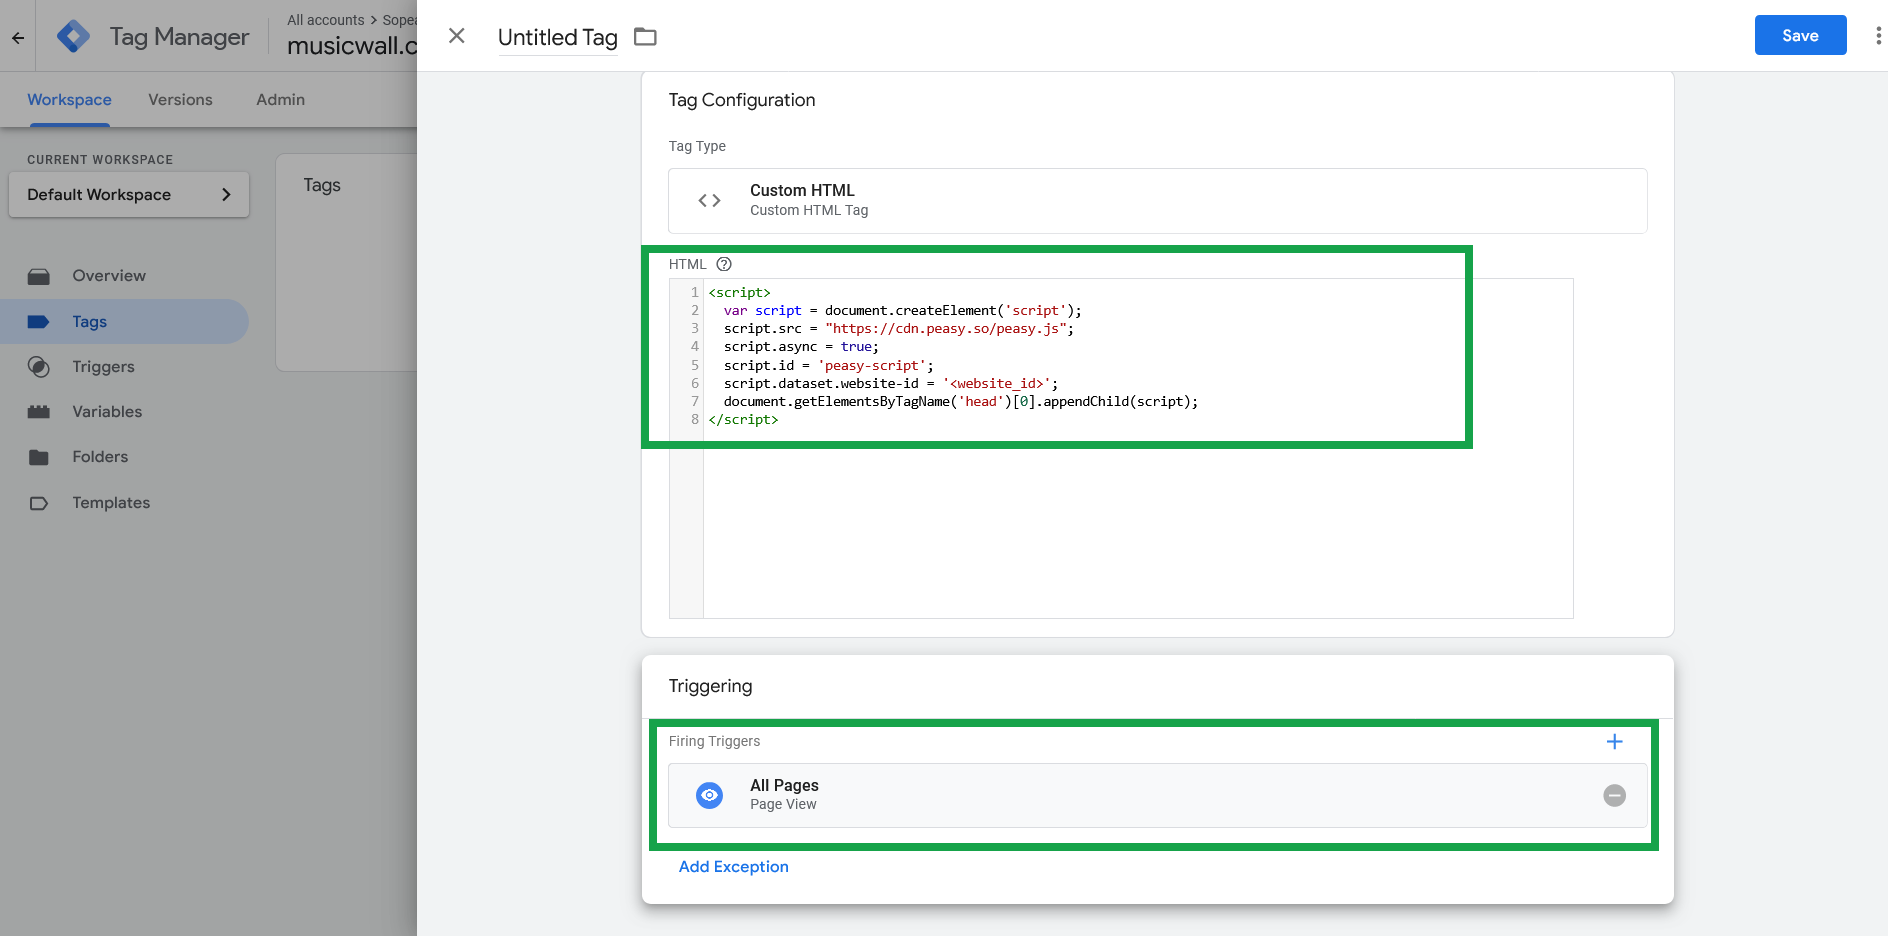
Copy the snippet below, replacing
<website_id>with your website id from your dashboard.<script> var script = document.createElement('script'); script.src = 'https://cdn.peasy.so/peasy.js'; script.async = true; script.id = 'peasy-script'; script.dataset.websiteId = '<website_id>'; document.getElementsByTagName('head')[0].appendChild(script); </script> -
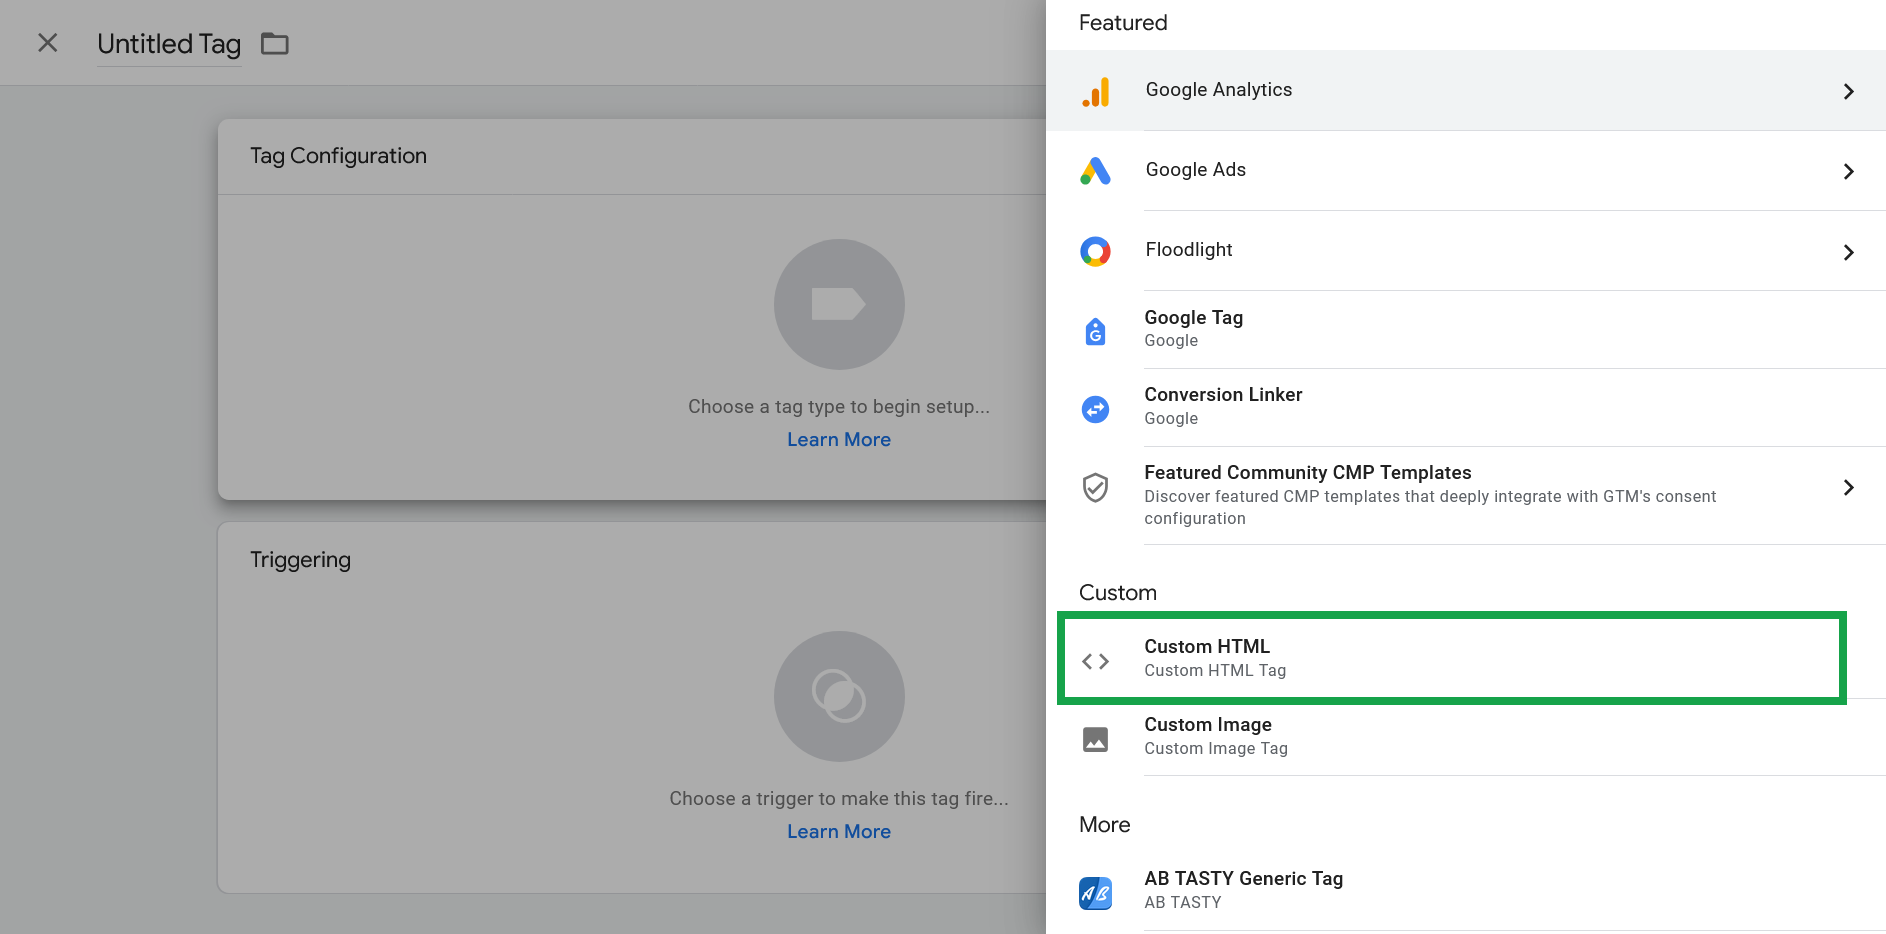
In GTM, create a new tag and select Custom HTML.
-
Paste your script into the HTML field.
-
Click Triggering and set it to All pages.
-
Name your tag, save, and publish your container.
Peasy will start tracking user interactions on your website.
Google Search Console
To connect your Google Search Console account to Peasy, follow the steps below.
-
Go to your dashboard and click on the
settingstab. Under theintegrationssection, click on theconnect google search consolebutton.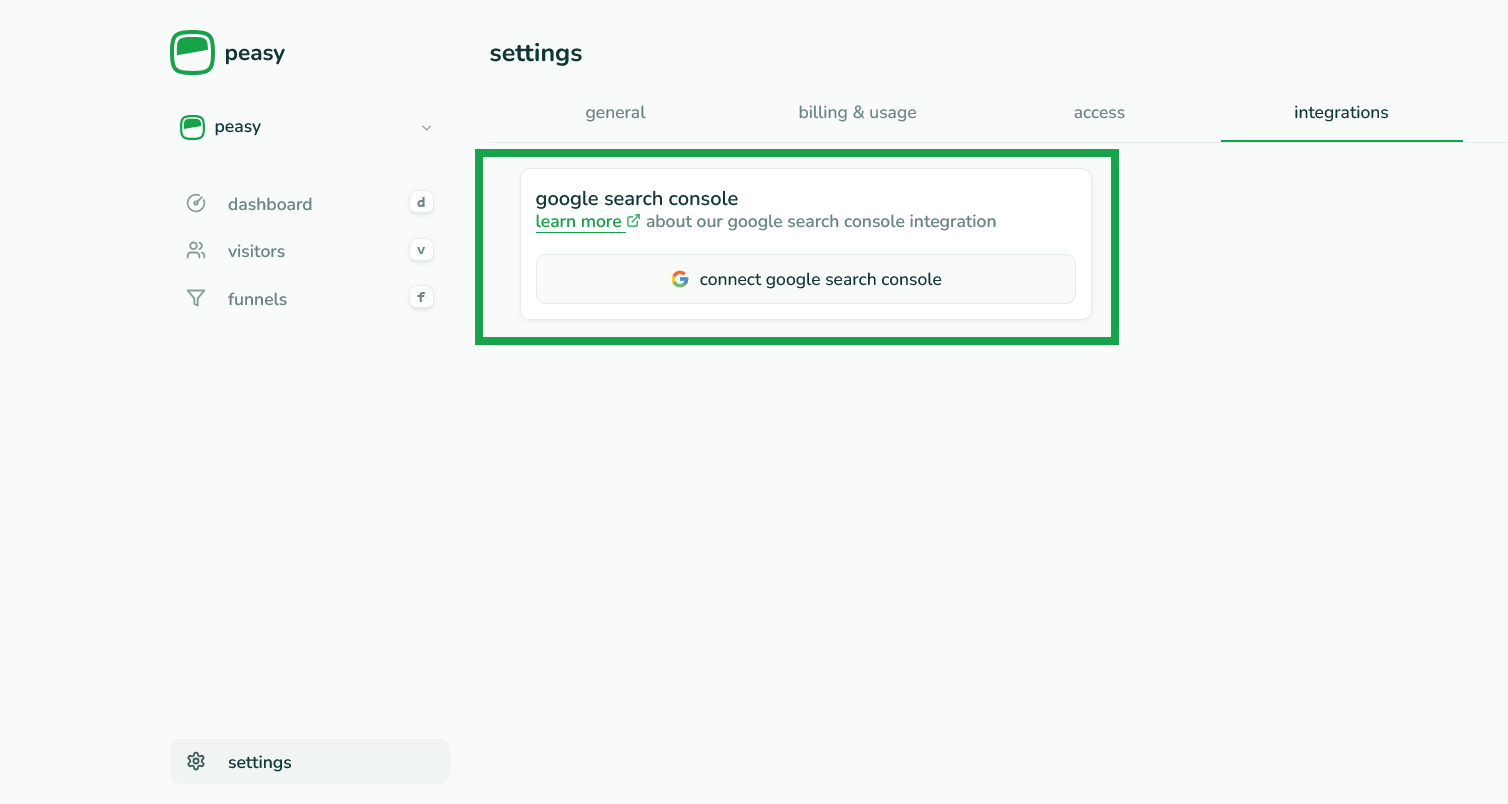
-
You will be redirected to Google to authorize access. Click on the
continuebutton and grant Peasy access to your Google Search Console data.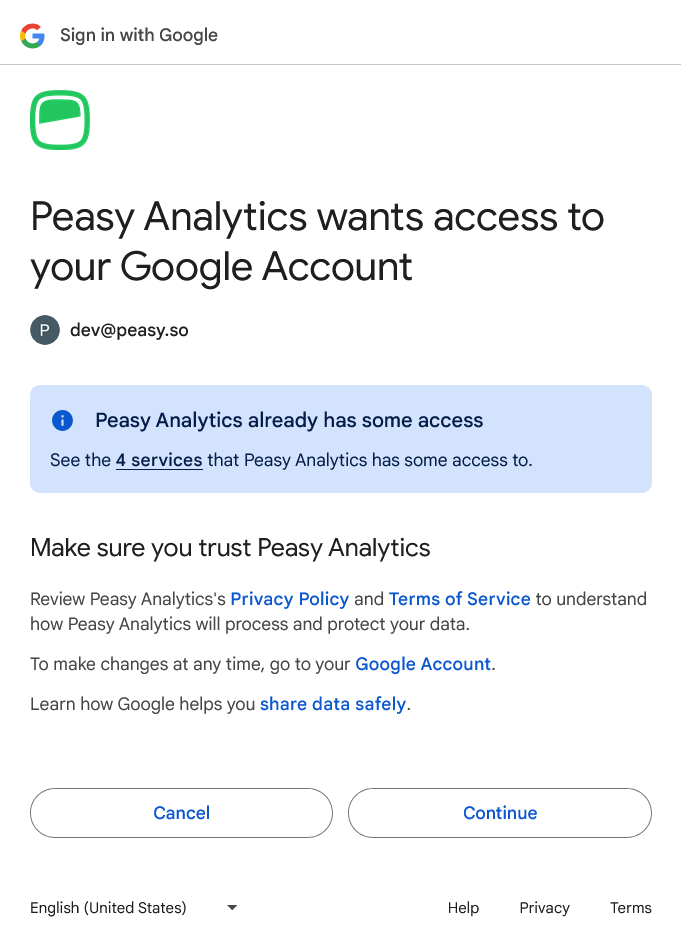
-
Once authorized, you will be redirected back to Peasy. You can then pick the site you want to link from the dropdown of properties associated with the Google account. Click the
linkbutton to connect the property.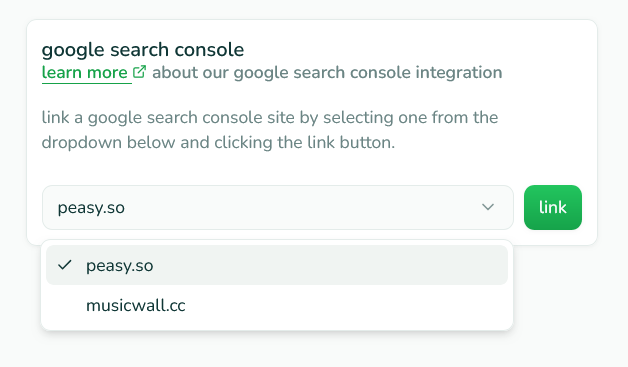
That’s it. You will now see your Google Search Console data in the dashboard.
ADVANCED
Profiles
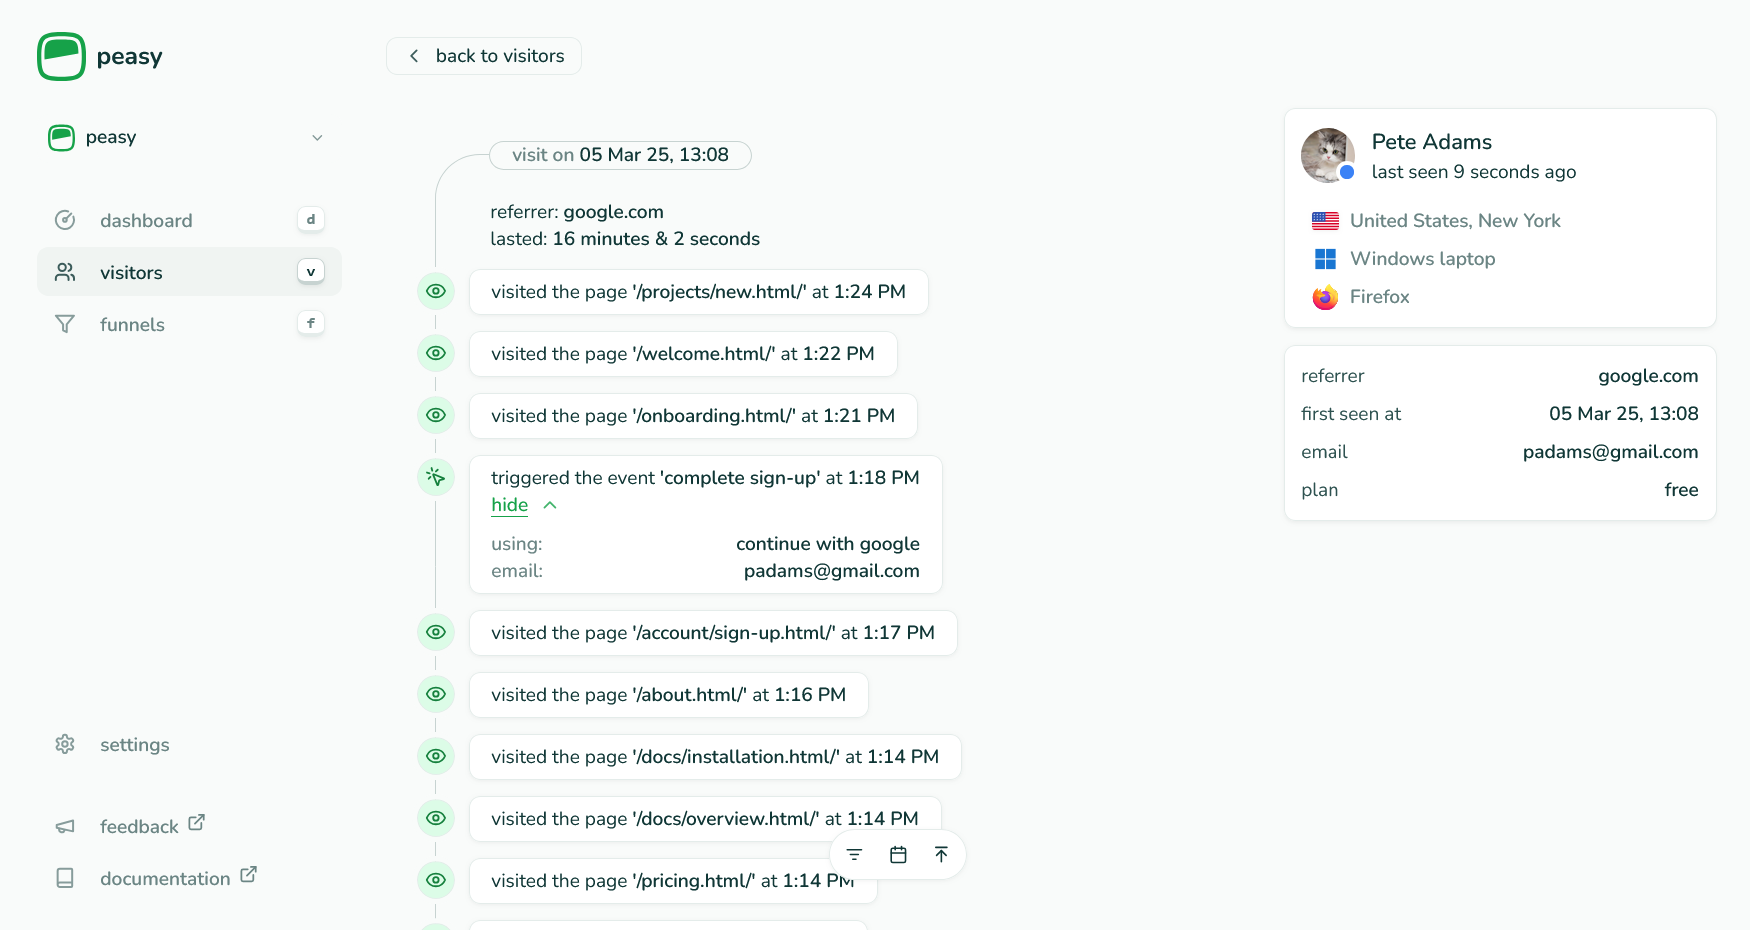
Profiles allow you to attach additional information to your visitors, making it easier to identify and track them in your dashboard. When you set a profile with a name and avatar, it will be displayed in the UI, giving you a more personal view of who’s using your site.
Setting a Profile
You can set a visitor’s profile using the setProfile function:
peasy.setProfile("profile-id", {
  $name: "sarah",
  $avatar: "https://example.com/avatar.jpg",
  role: "developer",
  team: "frontend"
})
💡 Set your visitor’s profile as early as possible in their session so all their events will be associated with their profile.
The $name and $avatar properties are special - they’ll show up in the dashboard UI automatically. Any other properties you add will be stored with the profile but won’t be displayed.
Updating Profiles
Profiles can be updated at any time by calling setProfile again. New properties will be merged with existing ones.
funnels
funnels allow you to track your users’ journey through a series of steps until they complete a conversion. you can define up to 5 steps in a funnel and track how many users complete each step, the percentage dropoffs at each stage, and the total conversion rate. a step may be an event your users trigger or a page they visit.
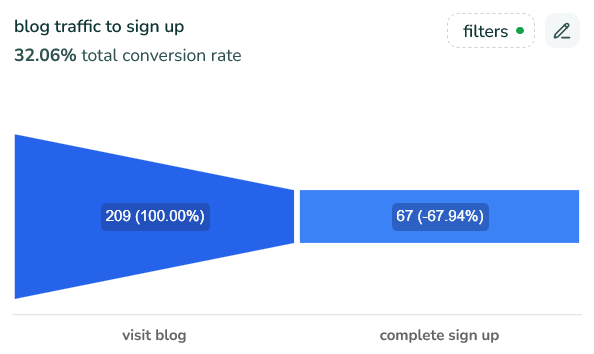 an example of a funnel
here are a few examples for funnels:
- track conversion from a blog post to registration
- see how well your Reddit campaigns convert visitors to purchase specific products
- analyze the completion of a tutorial or multi-page flow
creating a funnel
funnels are created by navigating to the funnels page on your dashboard and clicking the create funnel button. a page will appear where you can set your funnel name, its steps and filters.
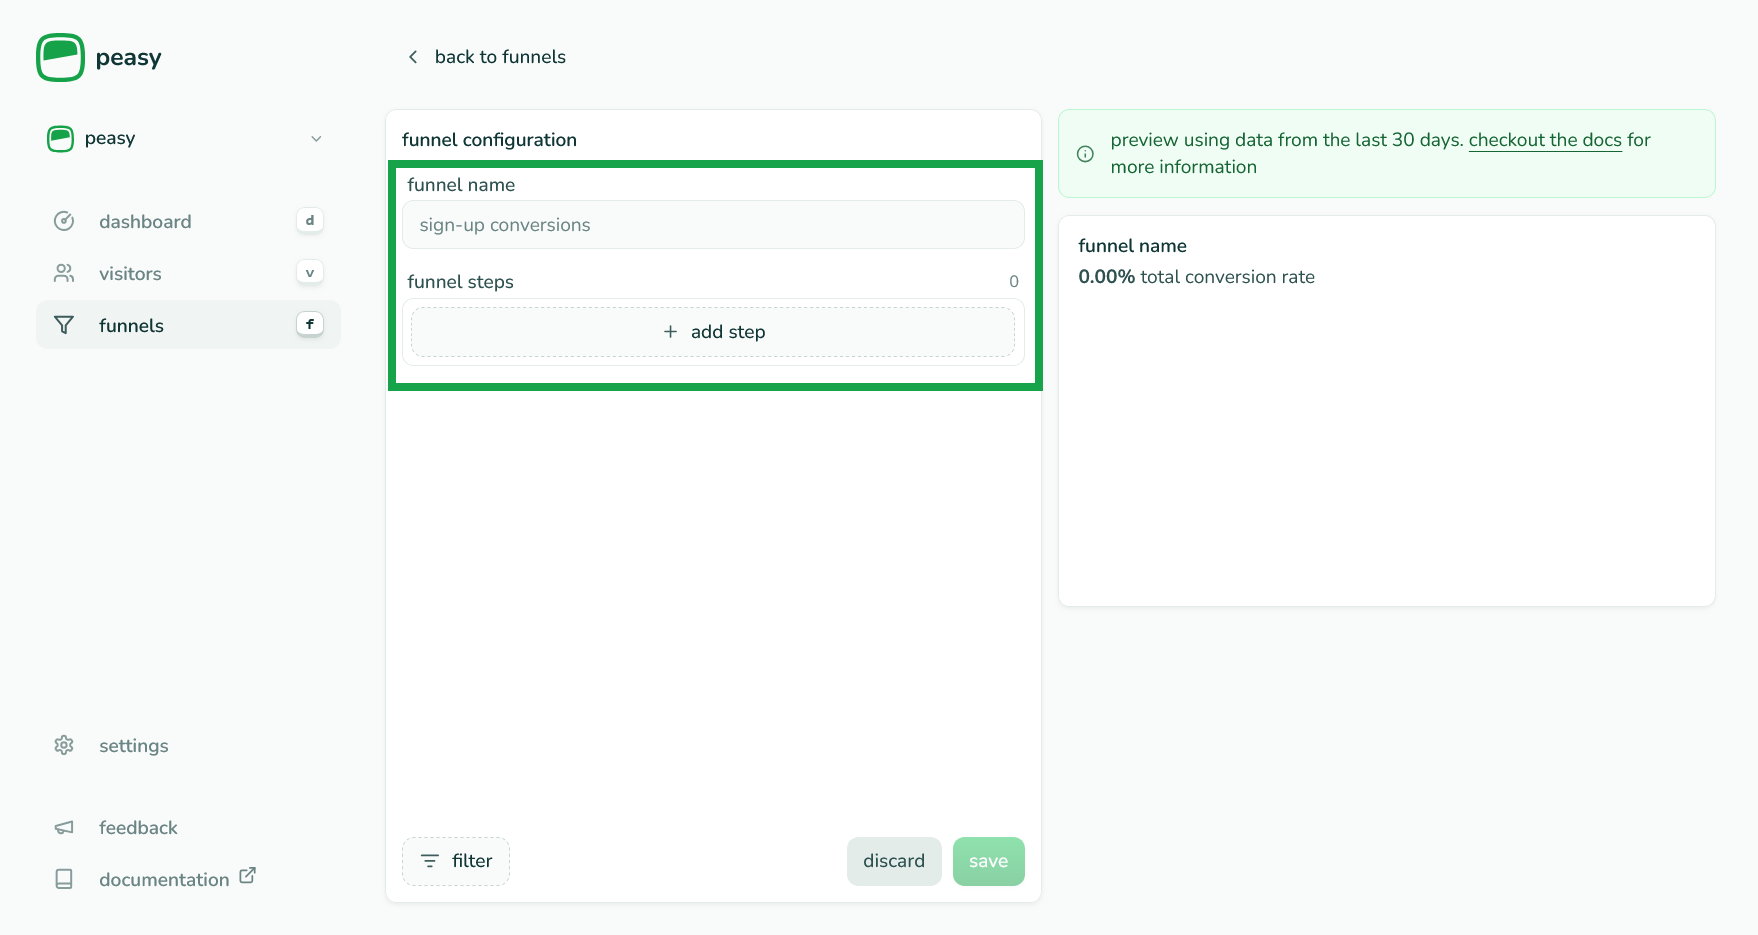
enter your funnel name and click the add step button to reveal the dialog below which will allow you to enter a step name between 2 and 32 characters, whether it’s from an event or page, and the respective event name or page url.
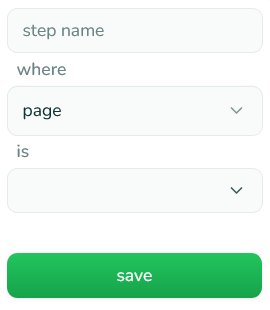 adding a funnel step
ℹ️ events and pages must be tracked in your application before they can be used in a funnel.
you can also set filters to the funnel to only include users who match specific criteria. for example, you can filter users who have a specific profile, came from a certain referrer or have triggered a specific event. filters apply to all steps in the funnel.
that’s it! your funnel will now appear in the dashboard, and you can start tracking your users’ journey through your application.
Proxying Peasy Analytics through Cloudflare Workers
Some ad blockers prevent requests to third-party domains, potentially hindering script loading and tracking. To prevent this, you can proxy the script and its requests through your own first-party domain.
You can set up a proxy with Cloudflare Workers. A free Cloudflare account is all you need to get started.
Here’s a guide to setting it up:
Creating the Worker
Create a free account at Cloudflare and navigate to Workers & Pages. Create and deploy a new worker using the Hello World template.
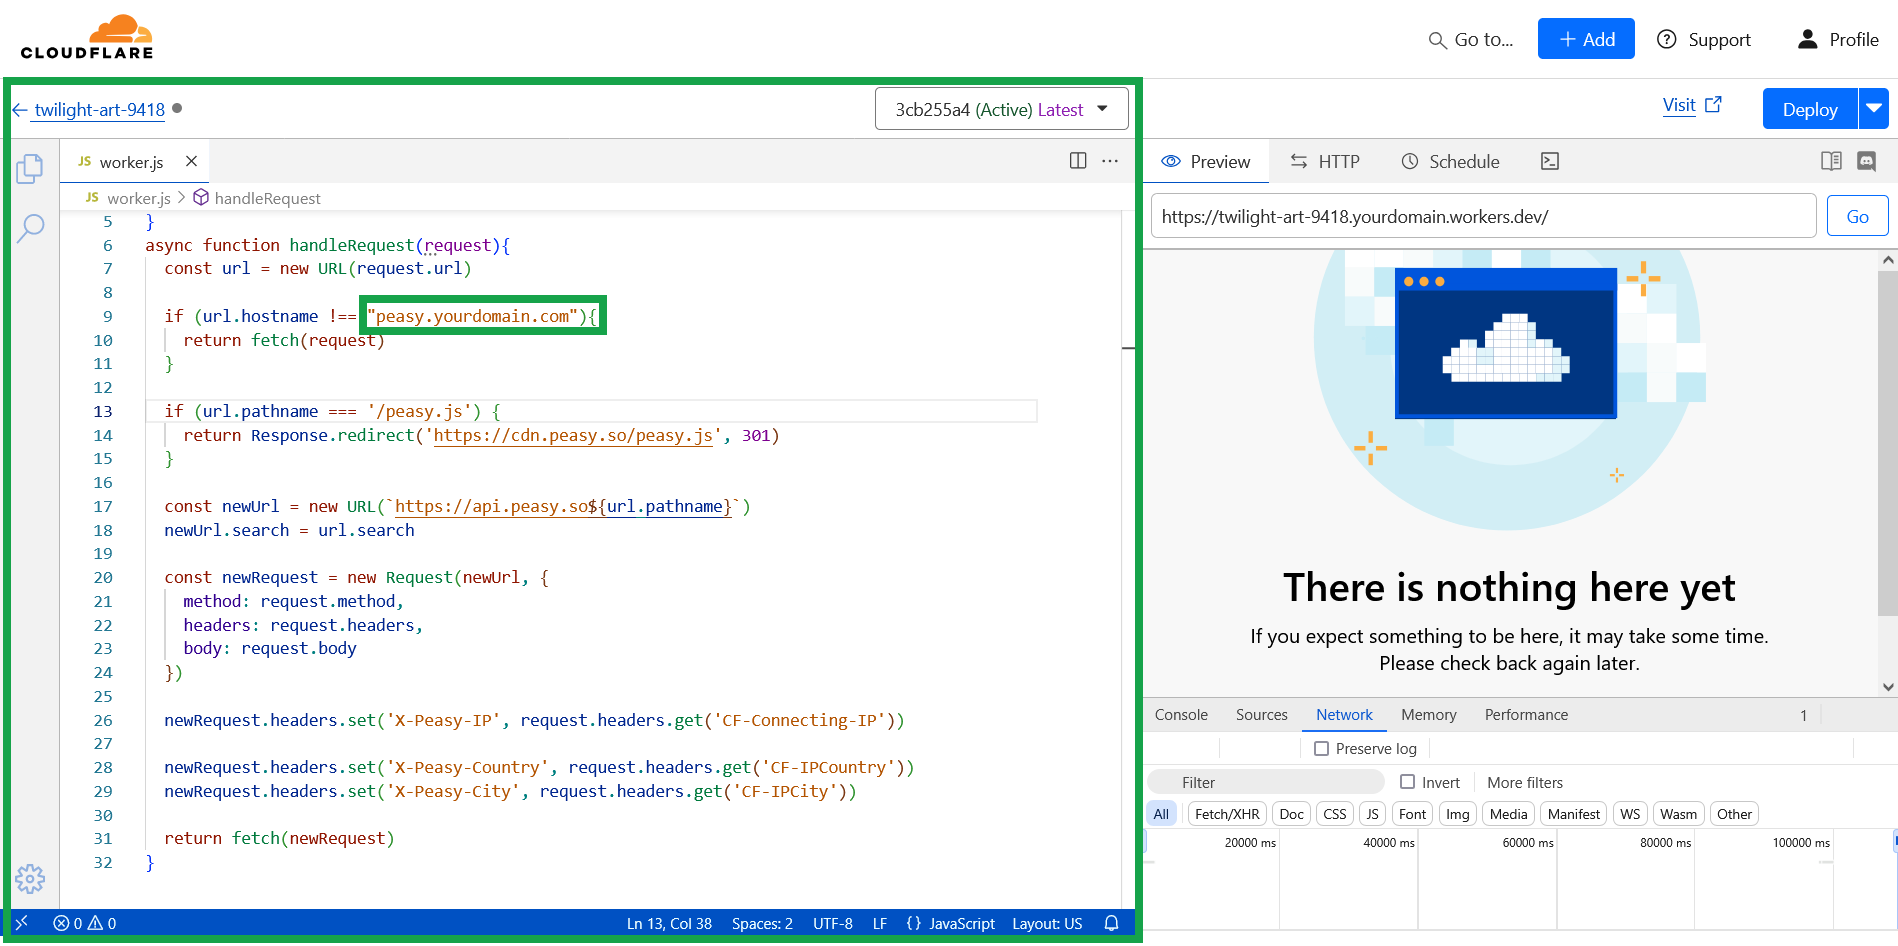
After deploying, click Edit code, remove the example code and paste the following code snippet:
export default {
  async fetch(request) {
    return await handleRequest(request);
  }
};

async function handleRequest(request) {
  const url = new URL(request.url);

  if (url.pathname === '/peasy.js') {
    return Response.redirect('https://cdn.peasy.so/peasy.js', 301);
  }

  const newUrl = new URL(`https://api.peasy.so${url.pathname}`);
  newUrl.search = url.search;

  const newRequest = new Request(newUrl, {
    method: request.method,
    headers: request.headers,
    body: request.body
  });

  newRequest.headers.set('X-Peasy-IP', request.headers.get('CF-Connecting-IP'));
  newRequest.headers.set('X-Peasy-Country', request.headers.get('CF-IPCountry'));
  newRequest.headers.set('X-Peasy-City', request.headers.get('CF-IPCity'));

  return fetch(newRequest);
}
Creating a Worker Route
Now navigate to Workers Routes, and create a new route there.
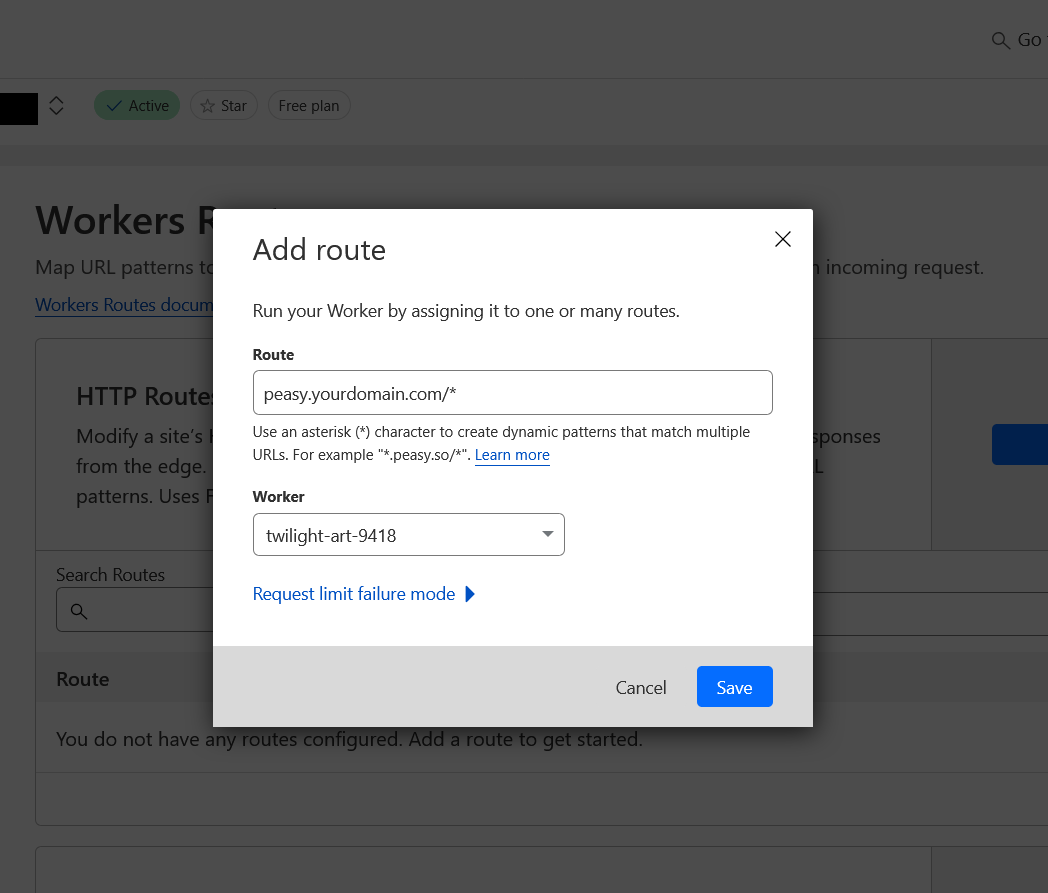
Set the route to match the domain you just configured in the Worker code.
In our case, it’s sln.yourdomain.com/*. Then, select the Worker you previously created, and hit Save.
Don’t forget the * wildcard.
Adding the DNS Record
For the last bit on Cloudflare, create a DNS record with type A, name it peasy, and set the content to 192.0.2.1.
This is a dummy IP address that will be replaced by Cloudflare with the Worker’s IP address.
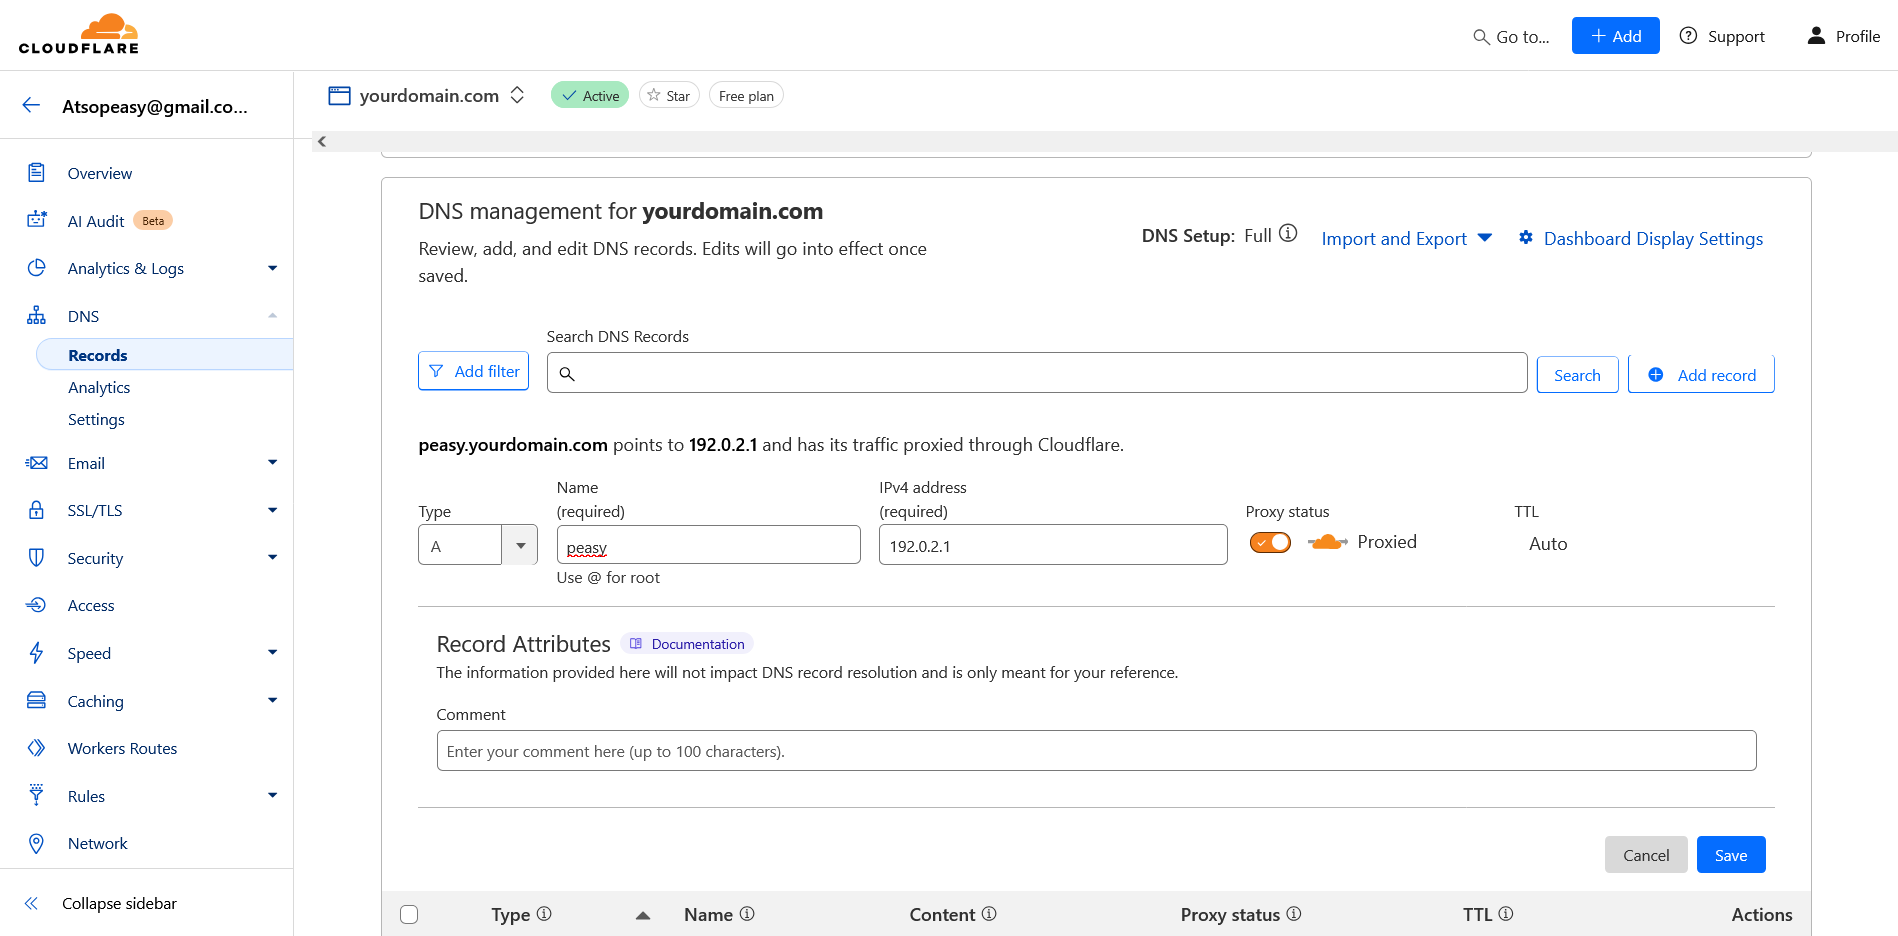
This should make sure all traffic sent to peasy.yourdomain.com is proxied through the Worker.
Updating the Script
Finally, update the script tag on your website to point to the new domain:
<script src="https://peasy.yourdomain.com/peasy.js" data-website-id="<website_id>" async></script>That’s it! You’ve successfully set up a proxy for Peasy Analytics through Cloudflare Workers. Now you can track your users without worrying about ad blockers blocking the script.
Integrating Peasy Crawler Analytics with Cloudflare — Simplified Guide
What You Need First
- A working Peasy account.
- Admin access to your Cloudflare dashboard.
- Your website should already be using Cloudflare (if not, look at the alternatives).
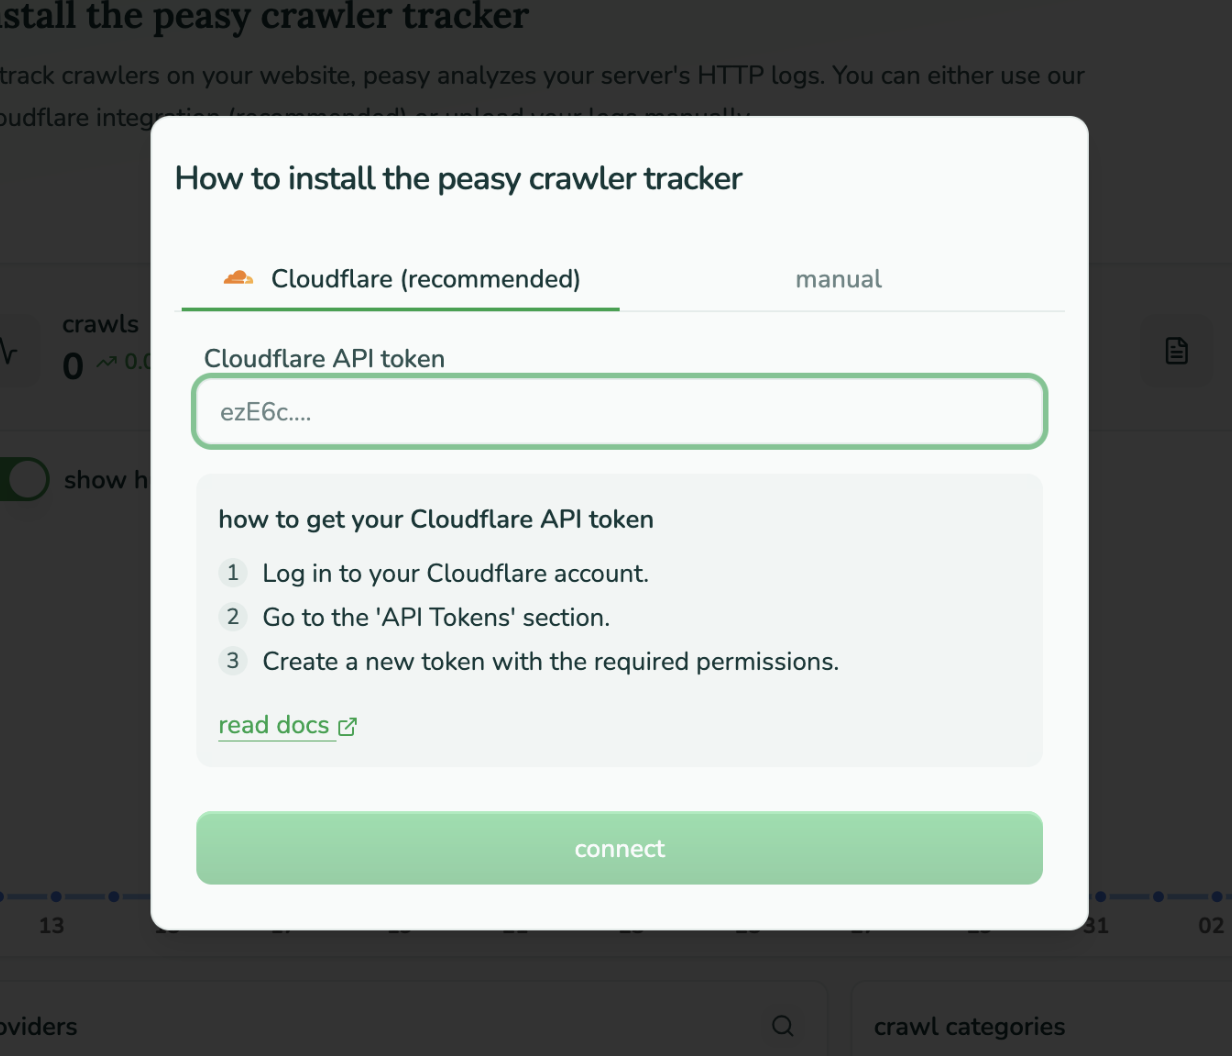
Step 1: Kick Off the Setup in Peasy
Head into Peasy’s Crawler Analytics page and click Connect. This pops up a modal that will walk you through the process
Step 2: Make Sure Your Domain is Proxied in Cloudflare
In your Cloudflare DNS settings, make sure the orange cloud icon is ON (proxied) for your domain. It’s essential - it lets Cloudflare intercept and track traffic for the analytics to work
Step 3: Create a Cloudflare API Token
- Go to the
API Tokenspage in Cloudflare.
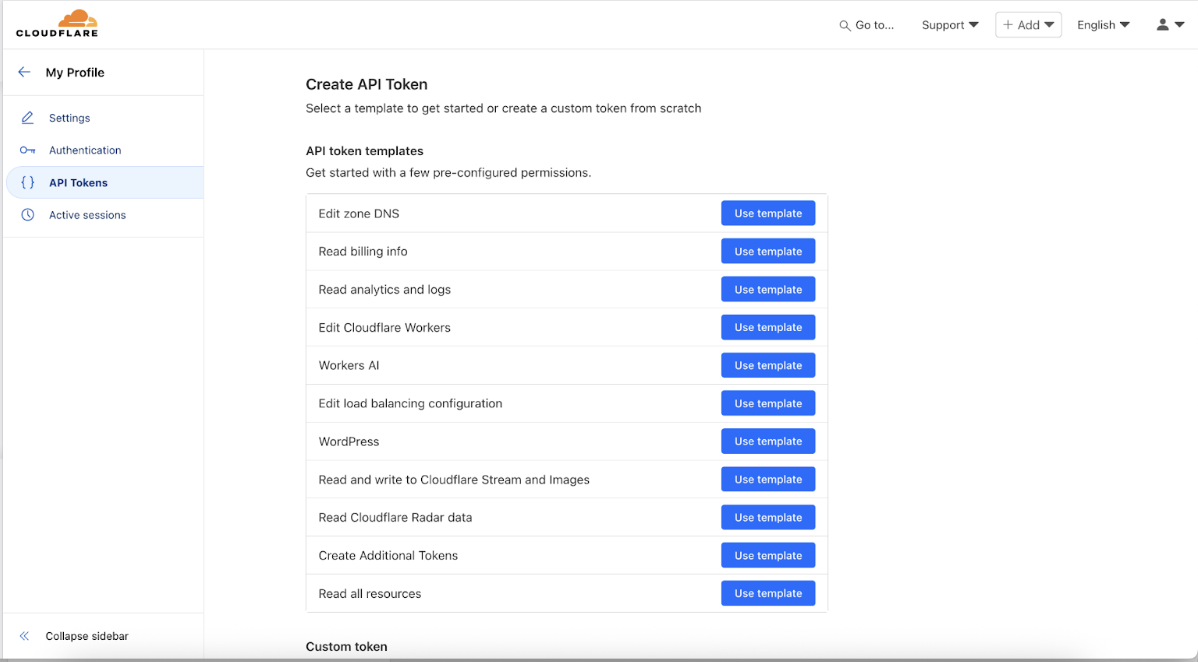
- Click
Create Token. - Use the
Edit Cloudflare Workerstemplate
Step 4: Trim Down the Permissions
- Remove all permissions except
Worker RoutesandWorker Scripts. - Under
Account Resources, choose your Cloudflare account. - Under
Zone Resources, pick the domain you want to track
Step 5: Finalize the Token
- Click
Continue to Summary. - Hit
Create Token. - Copy the generated token. You’ll need it for the next step
Step 6: Bring It Back to Peasy
- Back in Peasy, paste the token and click
Continue. - Everything else account, domain - is usually prefilled.
- Set your route path, like
subdomain.example.com/*if your zone isexample.com. You can leave out the wildcard in the subdomain - Hit
Finish. It takes just a few seconds to deploy
Step 7: Confirm It’s Working
Test it quickly:
- Open ChatGPT or Perplexity and ask it to look up your domain. For example: “Summarize this page: https://example.com.”
- Then go back to Peasy analytics page - now you should see incoming requests showing up.
- Click any links shown in the chatbot UI and you’ll see those visits recorded in your AI Visibility tab.
💡 This is only an example to help you test quickly. In practice, Peasy will always log events automatically:
- Crawlers show when AI platforms scan your site for indexing, research, or retrieval.
- AI Visibility records when your content surfaces in AI answers and users click through.
- Each AI chatbot tab displays crawling activity, AI citations and visits specific to that platform.